Running Second Life smoothly has gotten trickier for residents with older or weaker systems lately. While the addition of PBR most likely caused the largest impact for those systems, creators are also increasingly adopting 2K textures for their creations, providing higher fidelity and details on the meshes. But this comes at a price: older computers are starting to struggle in keeping up with the increasing demands.
Today I want to share with you how you can squeeze out a little more performance by tweaking the texture resolution settings in your viewer. Whether you’re on an old laptop or just want things running smoother, dialing back the texture resolution can sometimes make a noticeable difference.
Let’s begin with having a look at what the difference between 1K (1024×1024) and 2K (2048×2048) looks like.


I find that the above comparison provides a realistic example of the level of quality reduction you can expect. It’s definitely noticeable when the texture is closer to the camera, and while it is going to be very subjective, the difference may not be that significant at a distance – I’ll let you be the judge of that.
Before we go ahead and limit the texture resolution, let’s have a quick look at why this is sometimes a great addition to the other performance settings and if it is something you should consider.
Understanding Texture Resolution
Last year, Linden Lab increased the maximum texture resolution for uploads from 1024×1024 pixels to 2048×2048 pixels. Often referred to as respectively 1k and 2k textures.
Your viewer will typically load these higher-resolution 2k textures even when your system would perform better rendering the textures at a lower resolution. By limiting the maximum resolution of rendered textures, you may be able to regain some of the performance
Who Should Consider Limiting Texture Resolution?
While limiting the texture resolution alone won’t dramatically transform your Second Life experience, it can be an important piece of the performance optimization puzzle. When combined with other viewer settings adjustments, you should notice better performance, especially as creators are now increasingly adopting 2K textures in their products.
Consider limiting the texture resolution if you experience:
- Frequent viewer freezes or slow texture loading
- Severe performance drops in busy areas or during events
Limiting the texture resolution is particularly beneficial for:
- Systems with integrated graphics or limited video memory (VRAM)
- Older desktop or laptop computers (especially those 4+ years old)
- Computers already struggling with Second Life performance
Even residents with newer and more capable systems may benefit when:
- Running multiple viewers at once (for example if you have alts logged in at the same time)
- Visiting busy events or regions with complex builds with many high-resolution textures
- When you are using streaming or screen recording software
Limiting the texture resolution
Texture resolution settings vary between viewers. Some third-party viewers, such as the Cool VL Viewer and the Firestorm viewer, offer easy access to limiting the texture through their user interface, while others require applying the setting through the debug settings menu.
Let’s look at how we configure this for your preferred viewer – and if yours isn’t listed below, following the Second Life Viewer instructions should work just fine!
Official Second Life Viewer
While some of the third-party viewers have built in functionality for quickly limiting the texture resolution, this is not the case for the official Second Life viewer. That being said, we can still apply it, but we will need to do it through the debug menu.
First we need to ensure that the Advanced menu is enabled. If it isn’t already, you can quickly enable it by following the below steps:
- Open the Preferences menu by pressing CTRL+P (CMD+P if you’re a Mac user)
- Click Advanced in the left-hand side vertical menu.
- Check the Show Advanced Menu option.
- Press OK to apply and close the preferences menu.
The Advanced menu should be visible at the top bar in the viewer.

Now that we have the Advanced Menu enabled, we can proceed with limiting the texture resolution.
- Open the Advanced drop-down menu in the top menu bar
- Click Show Debug Settings
- In the Debug Settings window, type RenderMaxTextureResolution in the search bar
- Select the RenderMaxTextureResolution Search result
- Change the value field on the right-hand side from 2048 to either 1024 or 512 depending on your preference.
- Close the Debug Settings window, then either teleport away and back, zoom out as far as you can and move your camera a bit around, or restart the viewer to apply the new texture resolution limit.
Should you want to revert the changes back to 2048, repeat the steps above and click the Reset to default button or manually type in 2048.

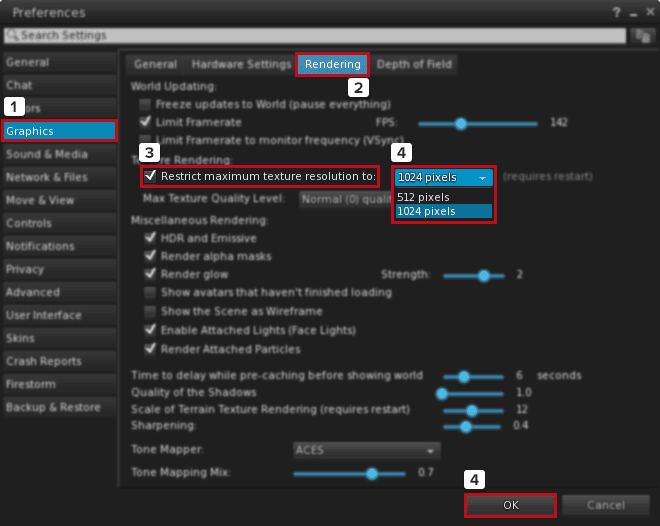
Firestorm Viewer
As the Firestorm viewer has implemented native functionality in the preferences menu, there’s no need for you to mess around in the debug menu, instead we only have to find and toggle the option in the Preferences.
- Press CTRL+P (or CMD+P if you’re using Mac) to open the Preferences menu.
- Open the Graphics tab on the left-hand side vertical menu.
- Now click the Rendering menu option in the horizontal menu.
- Find and toggle the the Restrict maximum texture resolution option to enable it.
- Select either 1024 pixels or 512 pixels from the drop-down menu.
- Press the OK button.
- Restart the Firestorm viewer and you’re good to go.
If you want to revert back to 2K textures, simply uncheck Restrict maximum texture resolution again and restart the viewer.
Black Dragon Viewer
While the Black Dragon Viewer does not have any built in preferences for limiting the texture resolution, we can in a similar fashion as the official Second Life Viewer define the limit through the Debug Settings.
Here’s how we do that:
- Click the Dragon button in the top-left side of the viewer window
- Open the Advanced option
- Click Show Debug Settings
- In the search field, type RenderMaxTextureResolution
- Click the RenderMaxTextureResolution search result
- In the value field, replace 2048 with either 1024 or 512 depending on your preference.
- Close the Debug Settings window and either teleport away and return, zoom as far out as you can and move the camera a bit around, or restart the viewer.
And that’s it. If you’d like to reset the settings to default, follow the steps above again and instead of typing a value, just press the Reset to default button.

Alchemy Viewer
While the Alchemy Viewer does not have any built-in functionality in the preferences for limiting texture resolution, we can limit the texture resolution through the Debug Settings.
Similar to the official Second Life Viewer, before proceeding we need to ensure that the Advanced menu is enabled, here’s how we do that in Alchemy.
- Open the Preferences menu by pressing CTRL+P (CMD+P if you’re a Mac user)
- Click Advanced in the left-hand side vertical menu.
- Check the Show Advanced Menu option.
- Press OK to apply and close the preferences menu.
The Advanced menu should be visible at the top bar in the viewer.

Now that we have the Advanced Menu enabled, we can proceed with limiting the texture resolution.
- Open the Advanced drop-down menu in the top menu bar
- Click Show Debug Settings
- In the Debug Settings window, type RenderMaxTextureResolution in the search bar
- Select the RenderMaxTextureResolution Search result
- Change the value field on the right-hand side from 2048 to either 1024 or 512 depending on your preference.
- Close the Debug Settings window, then either teleport away and back, zoom out as far as you can and move your camera a bit around, or restart the viewer to apply the new texture resolution limit.
Should you want to revert the changes back to 2048, repeat the steps above and click the Reset to default button or manually type in 2048.

Cool VL Viewer
The Cool VL Viewer features native functionality within the viewer to quickly limit the texture resolution with just a couple of clicks.
Here’s how you apply it:
- In the top menu, click on Advanced
- In the drop-down menu that appears, open Rendering and then Textures as shown in the screenshot below.
- Select the texture resolution limit you would like to apply, i.e. 1024×1024 or 512×512 pixels max.
- Either zoom far out and rotate your camera a bit, teleport away and back again or restart the viewer to apply the new maximum texture resolution selected.
If you would like to switch back to 2k / 2048 pixels, navigate to the same menu again as described above and then select 2048×2048 pixels max as the option.

Kokua Viewer
While the Kokua viewer does not have any built-in functionality in the preferences for limiting texture resolution, we can limit the texture resolution through the Debug Settings.
Similar to the official Second Life Viewer, before proceeding we need to ensure that the Advanced menu is enabled, here’s how we do that in Kokua.
- Open the Preferences menu by pressing CTRL+P (CMD+P if you’re a Mac user)
- Click Advanced in the left-hand side vertical menu.
- Check the Show Advanced Menu option.
- Press OK to apply and close the preferences menu.
The Advanced menu should be visible at the top bar in the view

Now that we have the Advanced Menu enabled, we can proceed with limiting the texture resolution.
- Open the Advanced drop-down menu in the top menu bar
- Click Show Debug Settings
- In the Debug Settings window, type RenderMaxTextureResolution in the search bar
- Select the RenderMaxTextureResolution Search result
- Change the value field on the right-hand side from 2048 to either 1024 or 512 depending on your preference.
- Close the Debug Settings window, then either teleport away and back, zoom out as far as you can and move your camera a bit around, or restart the viewer to apply the new texture resolution limit.
Should you want to revert the changes back to 2048, repeat the steps above and click the Reset to default button or manually type in 2048.

Final thoughts
So there you have it – a simple way to dial back the video memory usage while also reducing the loading time of textures. While this tweak alone won’t magically fix all of the performance issues you may be facing, I believe it is definitely a handy trick to have in your toolbelt.
Whether you are trying to squeeze out a little more performance out of an older or weaker system, or are just looking to keep things running a bit more smooth during packed events, limiting the texture resolution could give your system that extra bit of breathing room it needs.
While you may notice some quality difference up close, as shown in the comparison slider in the beginning of the blog post, the trade-off is often negligible at a distance. Remember – you’re not locked into these settings! You can always switch back and forth depending on what you’re doing inworld.
Stay tuned for more ways to improve your Second Life performance!

Thank you for this simple tip, I gained a noticeable improvement in the LL viewer doing this.
Awesome, glad it made a difference!